Retail Agent Receivable Reconciliation
The Retail Agent Receivable Reconciliation can be used foritems due from the Retail Agent.
To Perform a Reconciliation
- On the Primary
menu,
click ORGANIZATION.
- Select the lowest book level tab, such as the territories
tab and select the Details
 icon next to the entity to reconcile.
- Select the accounting > transactions > reconciliation tab.
- Click [Add
New Reconciliation]. The Reconciliation dialog box is displayed.
- In the Entity Type list, select Retail Agent. Two options are displayed, Payable Reconciliation and Receivable Reconciliation.
- Select Receivable Reconciliation.
- Once the entity is found, click OK. The reconciliation tab is displayed.
Note: Use the Maximize / Minimize  icon to display the full screen view of the reconciliation.

- In the Quick Navigation panel, click General Ledger. The General Ledger screen is displayed. The General Ledger link permits the addition of line items to use in the Journal Transactions screens.
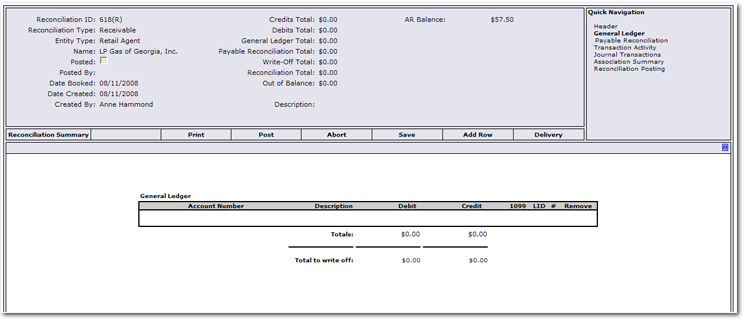
- On the Navigation Toolbar, click Add Row.
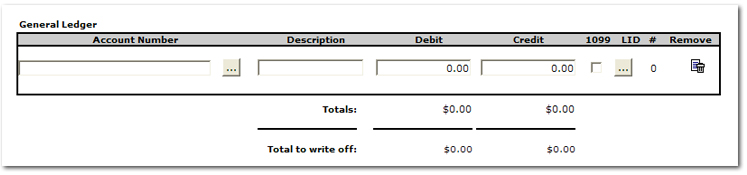
- Click the Ellipsis
 button to select a general ledger number.
- In the Description box, add the applicable description.
- In the Debit and Credit boxes, add debit or credit for offset.
- On the Navigation Toolbar, click Save. The General Ledger Total on the header is updated.
Tip: Clicking on another link in the Quick Navigation panel will also save the entries.
- On the Quick Navigation panel, click Payable Reconciliation. The Payable Reconciliation screen is displayed. The Payable Reconciliation screen permits selection of posted payable reconciliations for the retail agent to be incorporated into the retail agent receivable reconciliation.
- On the Payable Reconciliation screen, click [Add New]. The selection dialog box is displayed.
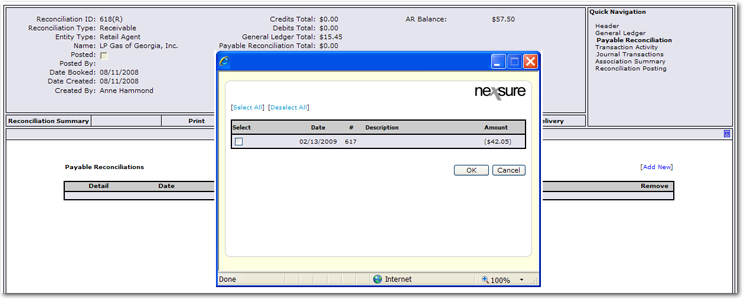
- Use the Select check box to select the retail agent payable reconciliation.
- Click OK. The Payable Reconciliation Total is updated.
- On the Quick Navigation panel, click Transaction Activity. The Transaction Activity screens give the opportunity to associate transaction activity.
- On theRetail Agent Transaction Association screen, click [Add New]. The available transactions are displayed.
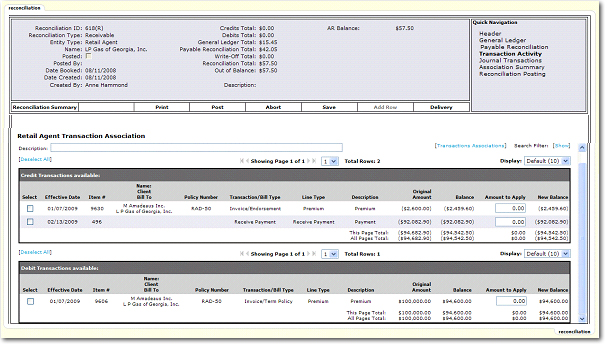
- In theCredit Transactions available area, select the applicable credits.
- In the Debit Transactions available area, enter the Amount to Apply.
Important: Applying credit(s) to debit(s) is one to many scenario. A single credit to multiple debits or multiple credits to a single debit. If posting when multiple credits to multiple debits is attempted, an error will be returned advising a correction is needed.
- On the Navigation Toolbar, click Save. The totals are updated in the header.
- Click [Transaction Associations] to save the associations set.
- On the Quick Navigation panel, click Journal Transactions. The Journal Transactions screens give the opportunity to associate journal activity.
- On the Journal Association screen, click [Add New]. The available transactions are displayed.
- In the General Ledger Items available area, select the applicable items. Selected items will result in a credit or debit, depending upon the General Ledger entry made previously.
- In the Transactions available area, enter the amount in the Amount to Journal box. The Transaction selected to be applied to the General Ledger item selected must be the same amount.
- On the Navigation Toolbar, click Save.
- In the Journal Transaction View screen, click [Journal Associations] to review association results.
Note: References to the term Write Off have been removed in this area and are equivalent to the term Journal.
- On the Quick Navigation panel, click Association Summary. The transaction activity line items are displayed.
- On the Quick Navigation panel, click Reconciliation Posting. The Reconciliation Details screen is displayed.
- On the Navigation Toolbar, click Post. The Post Reconciliation dialog box is displayed showing general ledger posting to be generated.
- Click OK. The post is complete.
Or
Click Cancel to return to the Reconciliation Details screen without posting.
- On the Navigation Toolbar, click Print to print either the Reconciliation Summary or the Retail Agent Remittance Advice.
Note: The Retail Agent Remittance Advice can be printed prior to posting.
Retail Agent Reconciliation
Retail Agent Payable Reconciliation